"The Zero Fee Blockchain"
You may or may not know it, but "the Zero Fee Blockchain" is coming and is called Koinos. Koinos is a general-purpose blockchain that has "Zero Fee", meaning that you can create your account, transfer assets and run smart contracts with "Zero Fee" involved. One other powerful feature it has is called "Universal Language Support", thanks to its WebAssembly (WASM) Virtual Machine (VM), any programming language that can compile to WASM can run on Koinos. To achieve that, an SDK (Software Development Kit) must be created to facilitate the communication between a smart contract and the Koinos VM. The core team itself worked on creating the first-ever available SDK which uses C++, it's fairly easy to use because you don't need to be a C++ Jedi master to write smart contracts, but still, it is not as accessible as using Solidity for example.
AssemblyScript SDK
A couple of months ago, I started working on a new SDK for the Koinos blockchain. There's a programming language out there called AssemblyScript (AS) that has been growing for the past few years and that was designed to compile to WASM (much more like Solidity was designed to be used on the Ethereum Virtual Machine (EVM)). Instead of trying to explain what AS is, I'm just going to quote the AssemblyScript website:
AssemblyScript compiles a variant of TypeScript to WebAssembly.
It is similar to TypeScript but with WebAssembly types.
You read that right! AS is just like TypeScript, but instead of compiling to JavaScript, it compiles to WASM 🤯. How convenient, right? That's exactly what we need, a programming language that compiles to WASM and that every developer out there can easily learn or that has already learned (yes, I'm talking to you JavaScript/TypeScript developers). What if your entire Web3 stack was entirely built around TypeScript? You don't need to learn a new language, simply build your smart contracts, your frontend and your backend with the tools and with a language that you already know. Knowing that, imagine how fast you can ship a project!
When I started working on this project I didn't know that AS was one of the best WASM programming languages there is. The Koinos team itself ran some benchmarks and compared the AS SDK to the C++ SDK. While in terms of computing performances, both SDKs produce very similar bytecode, AS excels in generating small-size WASM files, which in a blockchain environment, is a MUST-HAVE.
A couple of weeks ago, the Koinos team decided to make the AS SDK a "first-party software" and my work was moved to the official Koinos GitHub repo!
Create your first Koinos smart contract in minutes (if not seconds 😎)
Install NodeJS
Earlier I said that JavaScript (JS)/TypeScript (TS) developers wouldn't have to learn new skills to write a Koinos smart contract, so, what is that a good JS/TS developer has already installed on his computer? Yes, you're right, NodeJS! So, if you don't have NodeJS already installed, or if you have a version of Nodejs that's not version 16 or higher, I invite you to head over to the NodeJS website and download/install it. (Yes, that's exactly why it might take minutes instead of seconds to create your first Koinos smart contract 😂)
Download the SDK cli
There are several ways to go about it depending on which package manager you're using, but since I use yarn I'd encourage you to do so as well, just check the Yarn website, you'll see, it's just a command away!
The SDK CLI is just an npm package, so to install it, you just need to run this command:
yarn global add @roamin/sdk-as-cli
That's it, you just installed the SDK CLI globally on your computer, which means you can now call the CLI from your terminal. Let's try it to see if it was installed properly:
koinos-sdk-as-cli -V
should output something like:
1.0.3
(1.0.3 is the current version of the SDK when I'm writing this article)
Create the smart contract
You're now one command away from creating your first contract, without further ado, type the following command in the directory of your choice:
koinos-sdk-as-cli create myawesomecontract
The CLI command create takes one argument which is the name of the contract you want to create, so yes, you just created a smart contract called myawesomecontract 🥳
This command will output something like this:

In this case, you can see that I ran the command in a folder called tutorial and that, now, there's a new folder called myawesomecontract inside it. The CLI also outputs a set of commands that we can run to check if the contract was correctly generated and that it compiles and runs. Let's run these commands:
cd /Users/rr/Documents/blockchain/tutorial/myawesomecontract && yarn install && yarn build:debug && yarn test
What do these commands actually do?
cd /Users/rr/Documents/blockchain/tutorial/myawesomecontract: this just changes the current directory to the smart contract directory,myawesomecontracthereyarn install: this installs all the dependencies that we need to compile and test a Koinos smart contractyarn build:debug: this compiles the smart contract into WASM (the debug version of the wasm file to be precise)yarn test: this runs the unit tests of the smart contract
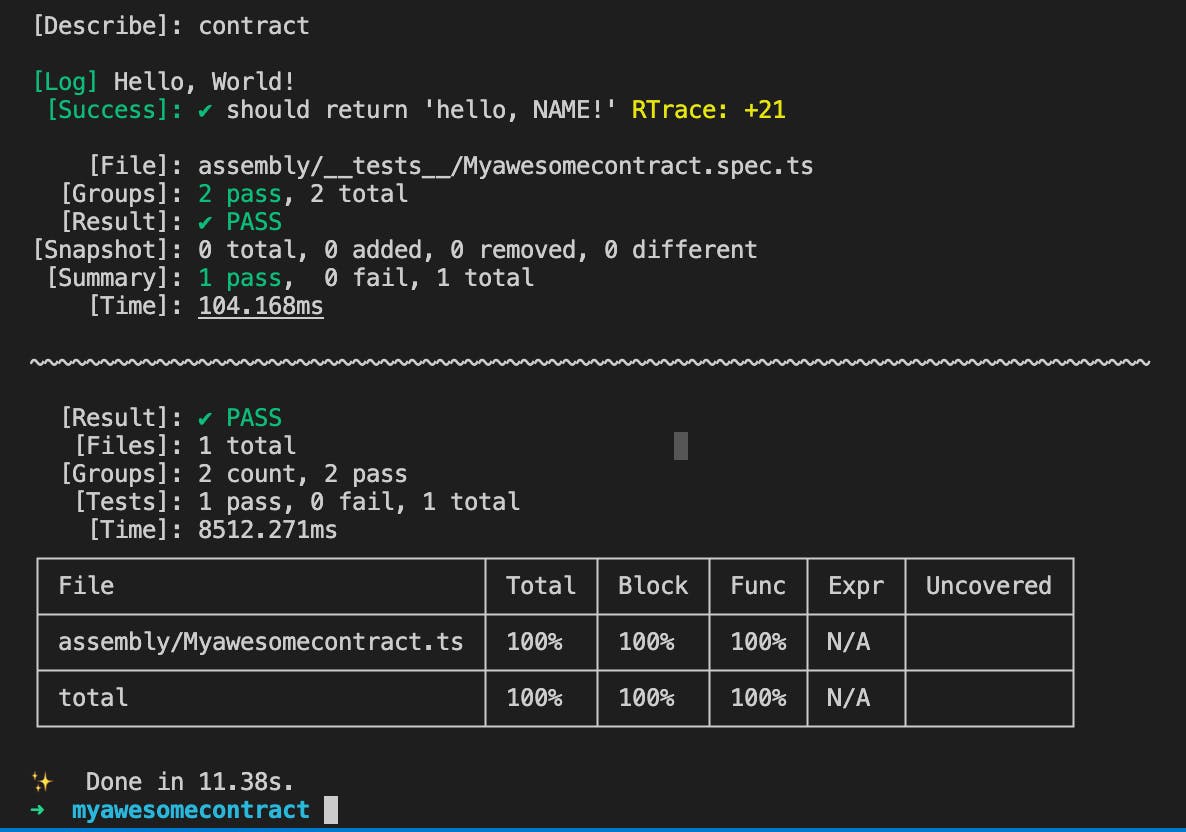
If all goes well, you should see something like that in your terminal, which means that your contract was successfully compiled and tested:

You might ask yourself:
But, wait, what contract did we just compile and test? I didn't write any contract!
And that would be a good question to ask yourself because you're right, you didn't write anything! 😁
The CLI generates a boilerplate smart contract, this allows you to quickly setup a new contract and also make sure that you're development environment is working properly.
Dive into the generated smart contract code
Before we dive into the source code of the smart contract, I invite you to install Microsoft Visual Studio Code(VS Code) if that's not something you've already done. That's just an IDE that's really good at handling TypeScript projects, I mean, that's normal right, isn't it Microsoft who invented TypeScript? 🤓 So, you can now open the myawesomecontract folder in VS Code
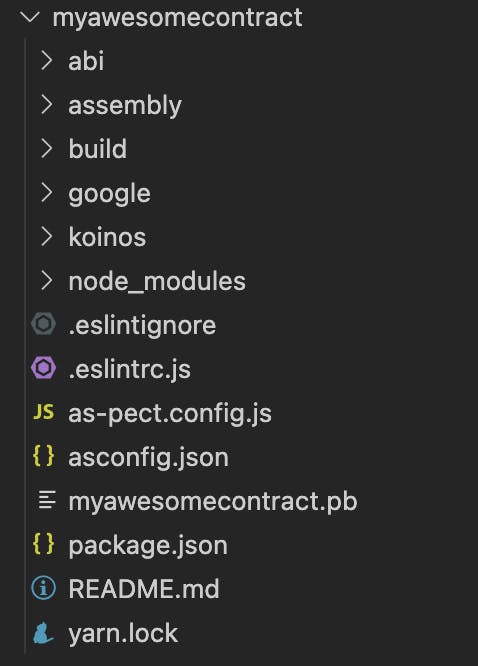
The content of this folder should be similar to this:

Today we will mainly focus on the assembly folder, simply because it's basically where all your smart contract-related code lives.
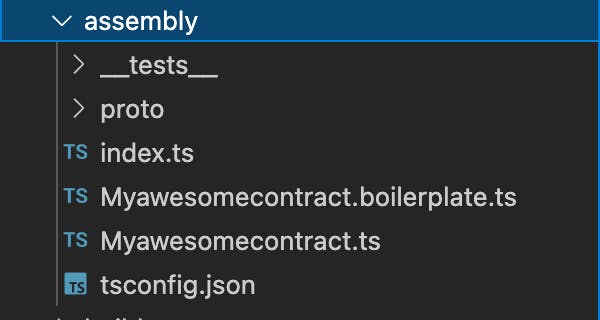
assembly folder:

the
__tests__folder, as its name suggests, is where you'll be creating the unit tests for your contractthe
protofolder is where yourprotofiles live, we'll talk about what is aprotofile in a few minutesindex.tsfile is the entry point of your contract, that's the file that will be called by the Koinos blockchain/VM when interacting with your contractMyawesomecontract.boilerplate.tsis the code that the CLI auto-generated based on yourprotofile description (I know, you still probably don't know what a proto file is 😂)Myawesomecontract.tsis the actual code of your smart contract and that's basically where you'll be spending most of your time codingtsconfig.jsonis just here to indicate to the IDE what types are available in AssemblyScript, remember, AS is like TypeScript but with WebAssembly types
proto folder:
One of the key features of the Koinos blockchain is that it leverages Protocol Buffers (Protobuf). Cool! euh! what is Protobuf? Well, I'll just quote the Protobuf website:
Protocol buffers are Google's language-neutral, platform-neutral, extensible mechanism for serializing structured data – think XML, but smaller, faster, and simpler.
Yup, that's it, it's just a way to serialize data 😂 But, keep in mind that we're talking about smart contracts that run on a decentralized computer (blockchain), so anything that small and fast is a perfect fit for this type of environment.
How does Koinos leverage Protobuf?
Simple, it's just everywhere in the codebase of the blockchain framework. It's used for interacting with the blockchain, it's used by the microservices that composed the blockchain framework and it's also used to store data on the blockchain. So, this means that since our smart contract most likely needs to store data and you're creating a smart contract for someone to use, you'll need to learn about Protobuf, but don't worry, it's super simple. It's just describing what's called messages that are just structures that you could find in any programming language. (a structure name and properties (a property type and a property name))
Let's have a look at our proto folder:

myawesomecontract.protowe'll look into this file a just a secondmyawesomecontract.tsis just the AssemblyScript code that's auto-generated from the aboveprotofile
let's have a look at the myawesomecontract.proto file
syntax = "proto3";

package myawesomecontract;

// @description Says Hello!
// @read-only true
message hello_arguments {
  string name = 1;
}

message hello_result {
  string value = 1;
}
I'm only going to focus on the important parts of this file:
package myawesomecontract;this is the package name to which this proto file belongs, in this case, it's just the name of the smart contractmessage hello_argumentsis divided into 3 parts:messagethis indicates that we're declaring a new proto messagehellois the name of the smart contract function this message describesargumentsmeans that this message describes the arguments of the function, in our case, thehellofunction
message hello_resultas you can guess is the message that describes theresultof the functionhello
A smart contract function always comes with a arguments message and a result message (even if the message is empty). On top of that, each arguments message must come with 2 comments:
@descriptionwhich is used to describe what the function does@read-onlywhich is used to indicate if the function is read-only or not, in other words, does your function needs to write onto the blockchain state or not
Inside the hello_arguments, you can see string name = 1; this means that our hello_arguments message has one property called name and that it's a string.
To summarize, in this proto file we are describing a hello function that takes a string called name as argument and returns a string called value as result. Easy, no?
You can learn more about Protobuf directly on Google's Protobuf website
When you're done creating your proto file or when you update it, you need to compile it so that the new AS files get generated, to do so you can use the CLI:
koinos-sdk-as-cli build-all debug 0 myawesomecontract.proto
This command will re/generate the myawesomecontract.ts file, the index.ts file as well as the Myawesomecontract.boilerplate.ts file.
Let's actually have a look at the generated Myawesomecontract.boilerplate.ts file, for simplicity, I'll directly add comments to the code to explain each part:
// import of the different helpers available in the Koinos AS SDK
import { System, Protobuf, authority } from "koinos-sdk-as";
// import of the AS generated proto file myawesomecontract.ts
import { myawesomecontract } from "./proto/myawesomecontract";

// export of the contract class
export class Myawesomecontract {
  // description of the hello function
  hello(
    // arguments of the hello function, which are of type "hello_arguments"
    args: myawesomecontract.hello_arguments
  ):
    // result of the hello function, which is of type "hello_result"
    myawesomecontract.hello_result {

    /*
      "name" variable that's directly extracted from the "hello_arguments"
      that we described in our proto file
    */
    // const name = args.name;

    // this where you would describe your smart contract function's logic

    // "res" variable that is of type "hello_result"
    const res = new myawesomecontract.hello_result();
    /*
      "value" variable that's directly extracted from the "hello_result"
      that we described in our proto file
    */
    // res.value = ;

    return res;
  }
}
The *.boilerplate.ts is very useful when you just start creating your contract or when you update your proto file since it will generate the boilerplate code of your smart contract functions.
Now, let's have a look at the actual smart contract implementation, I only added comments to the code that hasn't been explained previously:
Myawesomecontract.ts
import { System } from "koinos-sdk-as";
import { myawesomecontract } from "./proto/myawesomecontract";

export class Myawesomecontract {
  hello(args: myawesomecontract.hello_arguments): myawesomecontract.hello_result {
    const name = args.name;

    const res = new myawesomecontract.hello_result();
    // we now set the result to the string "Hello, " + name
    res.value = `Hello, ${name}!`;

    // Here we use the System call/function "log"
    // this will log the "res.value" in the transaction's receipt
    // (which we won't talk about today)
    System.log(res.value);

    return res;
  }
}
__tests__ folder:
Now, let's have a look at the last important piece of our contract, the unit tests!
In the __tests__ folder you should have a file called Myawesomecontract.spec.ts, that's where the unit tests for the smart contract function hello are written. If you're used to using Jest to test your JS/TS code, you won't be disappointed as the unit test framework used, as-pect, uses a syntax that's very similar to what you find inJest:
// import the smart contract ts file
import { Myawesomecontract } from '../Myawesomecontract';
// import the proto ts file
import { myawesomecontract } from '../proto/myawesomecontract';


describe('contract', () => {
  it("should return 'hello, NAME!'", () => {
    // instantiate the contract
    const c = new Myawesomecontract();

    // instantiate the arguments for the "hello" function
    const args = new myawesomecontract.hello_arguments('World');
    // call the "hello" function
    const res = c.hello(args);

    // check that the result of the "hello" function is what we expected
    expect(res.value).toStrictEqual('Hello, World!');
  });
});
Modify the generated smart contract code
Now that you have a better understanding of what a Koinos smart contract looks like (I hope 😂), let's modify our contract a little bit. Let's add a function that will simply add 2 numbers together.
Remember that to add a function to our contract, we need to modify our proto file, so let's start with that, open your proto file and add an add function:
// @description Adds 2 numbers together
// @read-only true
message add_arguments {
  // "add" accepts an argument called "a" that is of type "uint64"
  uint64 a = 1;
   // "add" accepts an argument called "b" that is of type "uint64"
  uint64 b = 2;
}

message add_result {
  // "add" returns a result that has a property called "value"
  // "value" is of type "uint64"
  uint64 value = 1;
}
Run the command:
koinos-sdk-as-cli build-all debug 0 myawesomecontract.proto
This will generate the new boilerplate files, you'll also get the following error, that's because we haven't added the function add to our contract yet:
ERROR TS2339: Property 'add' does not exist on type 'assembly/Myawesomecontract/Myawesomecontract'.

To remedy this problem, let's open the Myawesomecontract.boilerplate.ts file and copy the following auto-generated code:
add(args: myawesomecontract.add_arguments): myawesomecontract.add_result {
    // const a = args.a;
    // const b = args.b;

    // YOUR CODE HERE

    const res = new myawesomecontract.add_result();
    // res.value = ;

    return res;
  }
Now, open the Myawesomecontract.ts file and paste the new function in there. Let's implement the add function as follow:
 add(args: myawesomecontract.add_arguments): myawesomecontract.add_result {
    const a = args.a;
    const b = args.b;

    // "c" is just the addition of "a" and "b"
    // we use the "SafeMath" helper
    // this will ensure that our result won't overflow/underflow
    const c = SafeMath.add(a, b);

    const res = new myawesomecontract.add_result();
    // we set the "value" with the above calculated "c"
    res.value = c;

    return res;
  }
Alright, now that our new function has been implemented, let's add a new unit test for it! Let's go over to our Myawesomecontract.spec.ts file and let's add the following unit test:
it("should add 2 numbers", () => {
    const c = new Myawesomecontract();

    const args = new myawesomecontract.add_arguments(4, 8);
    const res = c.add(args);

    expect(res.value).toStrictEqual(12);
  });
And, let's run our tests to make sure it's working!
koinos-sdk-as-cli run-tests
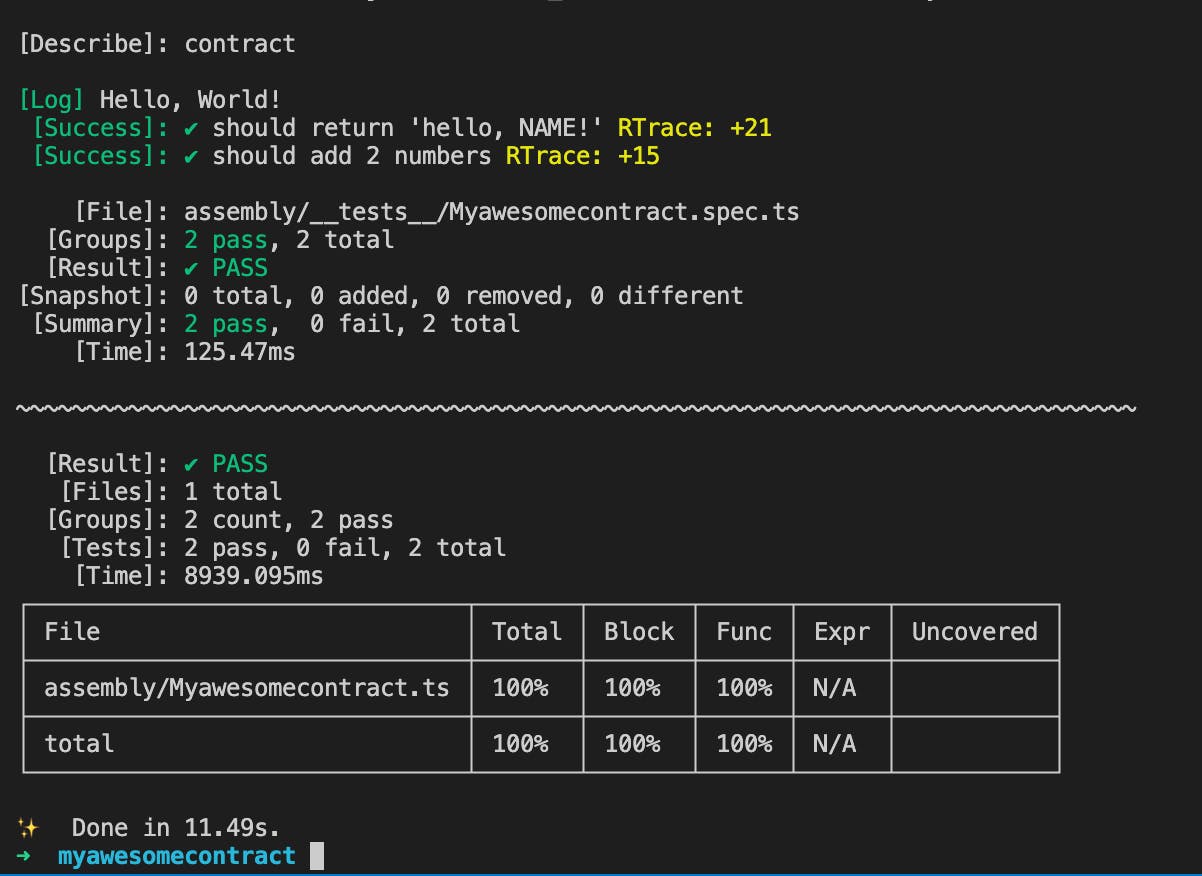
Which should result in:

And, here you have it, you just added a new function to your contract and you also made sure that it works!
Summary
You made it! 🥳🥳🥳
We just saw how to setup a smart contract development environment for Koinos, we also saw how to generate a smart contract and how to add functionality to it. We've done all of this locally, on our machine, without even connecting to any blockchain, without even having to create an account! 🤯
In the next article, we'll see how to upload our smart contract to Harbinger which is the Koinos testnet!